School exhibitions are the best spot to see talent and acknowledgement of young kids. The way students give presentations and explanations in front of their seniors, teachers are really impressive and good.
Project Makers got a project to make a handmade model of Rock cycle. Student wanted us to make a rock cycle for a science exhibition held or organized in her school. We asked her about the provision of material and her budget and she said she will provide material to us and her budget is adjustable.
We agreed and started work on the project. We discussed and prepared the list of material and sent it to the students. Student delivered the material and asked to write an explanation of one page for the same. We agreed. We started working on a model.
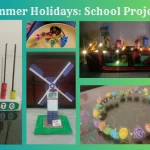
We first took a cardboard base from scrap and covered it with a chart. We drew a rough plan on it with pencil and started making elements. By folding and crumbling newspaper, we made rocks and sediments. We repeated the same technique and concentrated on making them of specific sizes.
After structuring them we worked on the base of the volcano. We made a cone with an ivory sheet and pasted it on the base. We prepared a sticky liquid with Fevicol and started applying it on the volcano base. We pasted bits of newspapers on the sticky liquid and in this way the structure of the volcano got solid.
Then came the painting task. We started mixing selected shades of paints in the mixing tray and added enamel in it to give it texture. While painting we took care of strokes and layers of paint. We added dual shade layers over each other to give a rocky effect. We painted molten lava coming out from the volcano in a realistic way. To show it real we picked hot colour shades orange, red and yellow. Way of mixing these colours, layering and strokes enhanced the appearance of lava.
Then in order to make rocks look more realistic we pasted real sand and granules on newspaper rock structures in some pattern and free style way.
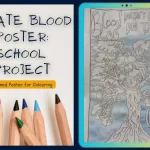
After that we added written labels in the model to make it more descriptive. We also wrote a detailed explanation of the model for the student. As per student we had to write one page but we wrote two pages to give some content as complementary to her. We were really happy with the output. There were some minor errors and the student came to us and asked to make changes. We accepted and did the required changes. She was happy and satisfied with our work. She also told us that she presented that model really well.